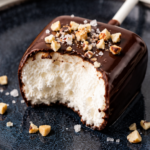


Low Carb Chocolate Covered Marshmallow on a Stick – A Fun, Guilt-Lite Treat

- Low carb marshmallows: Store-bought sugar-free marshmallows or homemade keto/low carb marshmallows (made with gelatin and a sugar substitute).
- Sugar-free chocolate chips or bars: Choose a brand sweetened with erythritol, allulose, or stevia. Aim for 55–70% cocoa for a classic milk-chocolate vibe or 70–85% for darker flavor.
- Coconut oil or cocoa butter: 1–2 teaspoons to thin the chocolate and improve snap.
- Vanilla extract (optional): A few drops to round out the chocolate flavor.
- Flaky sea salt (optional): For contrast and a gourmet finish.
- Coatings (optional): Finely chopped roasted nuts, unsweetened shredded coconut, or crushed freeze-dried berries.
- Sticks: Lollipop sticks, skewers, or small craft sticks.
- Parchment paper and a baking sheet: For setting the chocolate.
- Prep the tray: Line a baking sheet with parchment paper and clear a spot in your fridge or freezer so the dipped marshmallows can set quickly.
- Skewer the marshmallows: Gently push a stick into each marshmallow, stopping before it pokes through the top.
If your marshmallows are very soft, chill them for 10–15 minutes first to firm up.
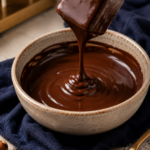
- Melt the chocolate: Add the sugar-free chocolate and coconut oil or cocoa butter to a heatproof bowl. Microwave in 20–30 second bursts, stirring between each, until smooth and glossy. Or melt over a double boiler on low heat.
- Flavor the chocolate (optional): Stir in a few drops of vanilla extract.
Taste and adjust if your chocolate is very dark; a pinch of salt can balance bitterness.
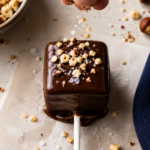
- Dip the marshmallows: Angle the bowl and dip each marshmallow, swirling to coat. Let the excess drip off while you rotate the stick for an even shell.
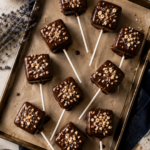
- Add toppings: While the chocolate is still wet, sprinkle on nuts, coconut, or a dusting of freeze-dried berries. A small pinch of flaky salt adds great contrast.
- Set on the tray: Place the coated marshmallows on the prepared baking sheet.
If you want perfectly round bases, hold them for a few extra seconds until the chocolate thickens slightly before setting them down.
- Chill to set: Refrigerate for 15–20 minutes or freeze for 8–10 minutes until the chocolate is firm.
- Serve or store: Enjoy right away, or transfer to an airtight container with parchment between layers.