

There’s something about a handmade ornament that a store-bought one can never match. Every year when the boxes come down, the clay ornaments are the ones we pick up, turn over, and say “remember when we made this?” Air dry clay Christmas ornaments are affordable, beginner friendly, and need no kiln or oven, and with a few simple tricks they look like they came straight from a holiday boutique.
Quick heads-up: this post contains affiliate links. If you buy something I recommend, I may earn a small commission at no extra cost to you, which I will promptly spend on more clay (and the paper towels to clean it off my counters). As an Amazon Associate I earn from qualifying purchases.
Below you’ll find 20 air dry clay Christmas ornament ideas, from personalized family keepsakes and baby’s first Christmas ornaments to stamped stars, gingerbread, pressed botanicals, and modern boho shapes. I’ve included the simple method I use for every ornament, how long they take to dry, and how to seal them so they last for years on the tree.
Boutique-worthy clay ornaments in 3 moves
- Roll evenly to 6 mm. Even thickness is the secret to ornaments that dry flat and don’t crack.
- Stamp and poke the hole while wet. Letters, textures, and hanging holes all go in before the clay starts to dry.
- Dry slowly, then seal. Flip after 12 hours, dry fully for 24 to 48 hours, then paint and seal with matte or satin varnish.
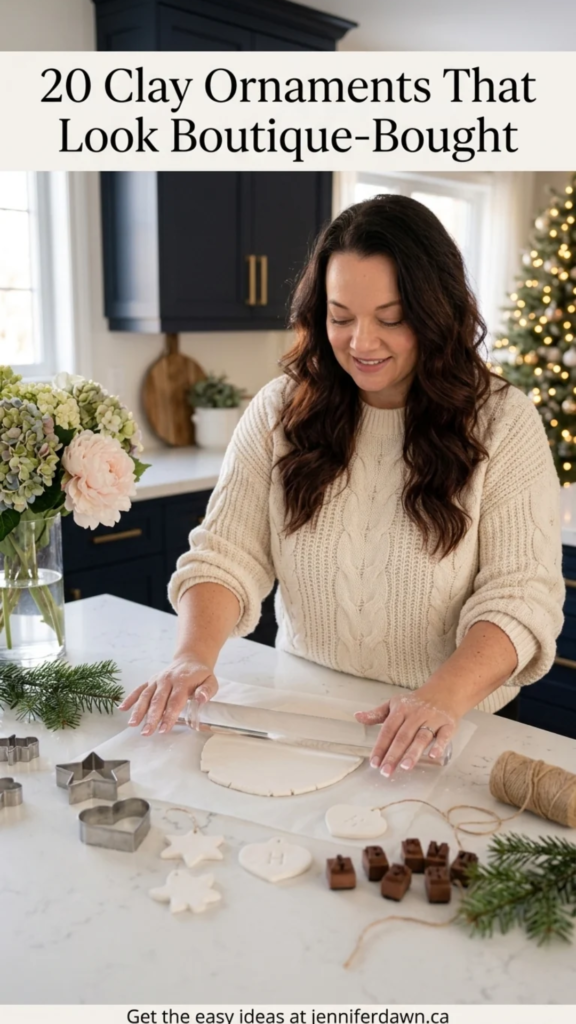
What You Need to Make Air Dry Clay Christmas Ornaments
You don’t need a big craft stash to start. Most of these ornaments use the same handful of supplies, and once you have them you can make a whole tree’s worth in an afternoon. If you’re brand new to clay, my beginner’s guide to air dry clay walks you through everything first.
Everything for a full batch of ornaments
- Air dry clay: white or natural, about 500 g makes 15 to 20 ornaments
- Rolling pin: acrylic or wood, plus two paint stirrers as thickness guides
- Cutters or a craft knife: cookie cutters in stars, hearts, trees, and houses
- Letter and texture stamps: for names, words, and patterns
- A straw or skewer: for clean hanging holes
- Parchment paper: to roll and dry on so nothing sticks
- Hanging cord: twine, jute, velvet ribbon, or leather cord
- Finishing touches: wooden beads, small bells, acrylic paint, and gold paint pens
- A soft brush and varnish: matte or satin sealer to protect the finish
My Air Dry Clay Ornament Kit
The clay, stamps, cutters, and cords I use for every batch of ornaments.
SHOP AIR DRY CLAY SUPPLIES
How to Make Air Dry Clay Christmas Ornaments
Every ornament on this list follows the same basic method. Learn it once and you can make any shape, stamp, or style you like.
The basic clay ornament method
- Condition the clay. Knead a fist-sized piece for a minute or two until it’s smooth and warm, with no cracks.
- Roll it out evenly. Roll between two sheets of parchment to about 6 mm thick, using paint stirrers on each side as guides.
- Add texture or stamps. Press in lace, leaves, or letter stamps now, while the surface is soft.
- Cut your shapes. Press cutters straight down and lift. Smooth any rough edges with a damp fingertip.
- Make the hanging hole. Use a straw about 1 cm from the top. Never skip this before drying.
- Dry slowly and flat. Leave on parchment and flip after 12 hours. Most ornaments are fully dry in 24 to 48 hours.
- Sand, paint, and seal. Lightly sand the edges, paint or leave natural, then finish with matte or satin varnish.
To stop thin ornaments from curling as they dry, lay a sheet of parchment and a light book on top for the first few hours. They’ll dry perfectly flat.
Personalized Keepsake Clay Ornaments
These are the ornaments that become heirlooms. A name, a date, or a tiny footprint pressed into clay turns a simple craft into something the family will hang every year.
1. Personalized Family House Ornament
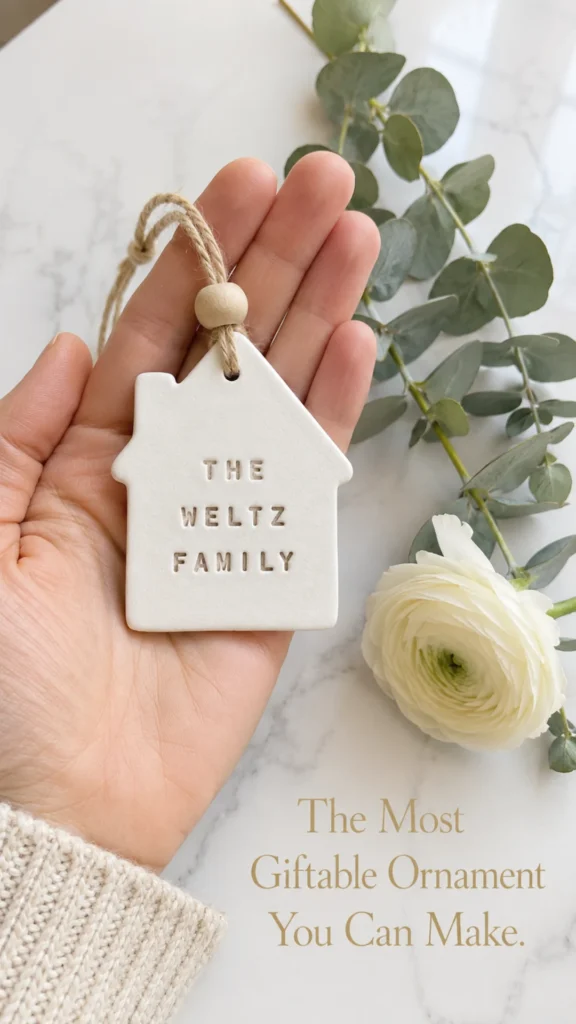
Cut a simple house shape from 6 mm clay with a knife or house cutter, then stamp every family member’s name across the front while the clay is soft. We stamp ours with The Weltz Family and add the year along the roofline. Once it’s dry, finish with natural twine and a wooden bead. It also makes a lovely housewarming or new-home gift.
2. Baby’s First Christmas Onesie Ornament
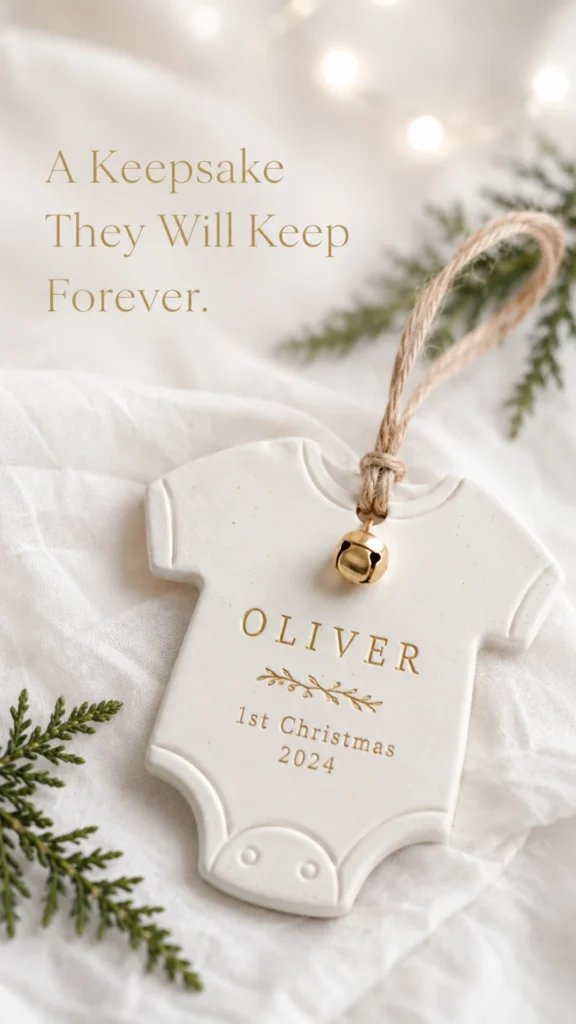
Cut a onesie shape, then stamp the baby’s name and year across the chest, like “Olivers First Christmas 2024.” When it’s dry, brush gold paint over the stamped letters and wipe the surface with a damp cloth so the gold stays only in the grooves. Add a small gold bell on the ribbon. It’s one of the most-loved gifts for new parents and grandparents.
3. Handprint or Footprint Keepsake Ornament
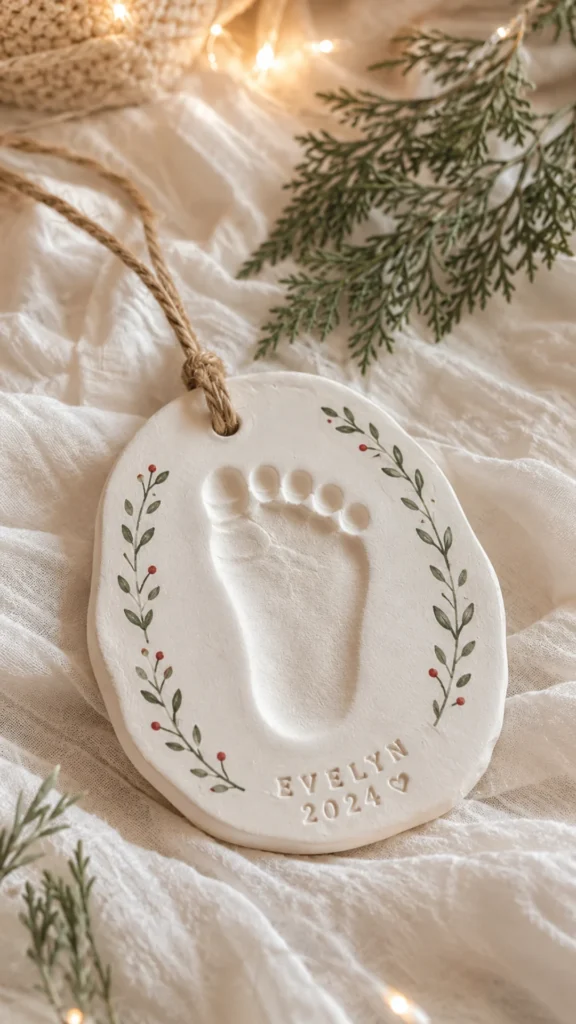
Roll a piece of clay a little thicker, about 8 mm, and gently press a little hand or foot into it, rocking slightly from heel to toe. Cut an oval or circle around the print with a knife and add the hanging hole. Once dry, paint a simple wreath around the print and add the name and year, like “Evelyn 2024.” Clean little hands and feet with a baby wipe right away.
4. Initial or Monogram Ornaments

Stamp a single letter onto a round disc, or cut the letter itself out of clay using a printed template. Make one for each person in the family (our set is J, C, C and N) and hang them together on the tree or tie them onto gifts as name tags. White clay with gold hardware looks elegant, and natural clay with jute looks rustic.
5. Personalized Pet Ornament
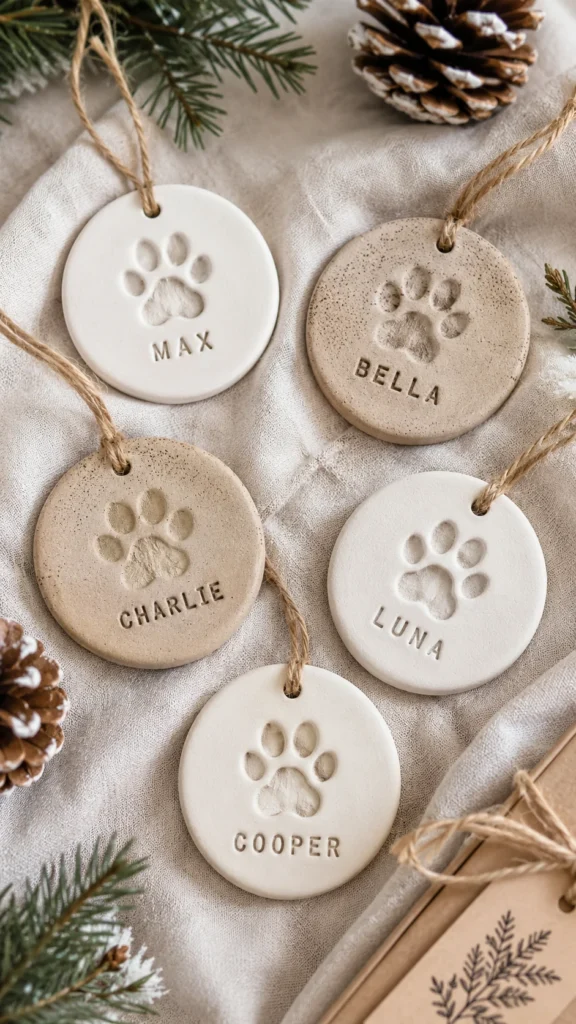
Press a paw print into a small clay disc using a paw stamp or your fingertip and the end of a paintbrush, then stamp a name underneath. You can use the pet’s name, or make a matching family set like these stamped Max, Bella, Charlie, Luna and Cooper so the fur babies have their own spot on the tree. These are quick to make in multiples and are a sweet gift for every pet lover you know.
Classic Christmas Clay Ornaments
Stars, hearts, bells, and gingerbread never go out of style. These are the easiest ornaments to batch, which makes them perfect for filling a whole tree or packing up as gifts.
6. Stamped Christmas Tree Ornaments

Cut tree shapes and stamp a single word down the centre, like PEACE, HOPE, or JOY. Once dry, brush watered-down brown or grey acrylic over the whole ornament and wipe it back right away with a damp cloth. The paint stays in the letters and texture, giving you an antiqued, farmhouse finish in seconds.
7. Star Ornaments with Impressed Texture

Before cutting, lay a piece of lace, burlap, or a real leaf on your rolled clay and roll over it once with firm pressure. Peel it away and cut your stars right through the pattern. Leave them white with gold edges, or rub in a brown wash for a vintage look. No two ever come out the same.
8. Heart Ornaments with Word Stamps

Cut hearts and stamp one word in the middle of each: LOVE, JOY, NOEL, or PEACE. Make the hanging hole near the top dip so the heart hangs straight. A set of four tied with twine makes a beautiful teacher or neighbour gift.
9. Snowflake Ornaments with Rubber Stamps

Press a rubber snowflake stamp into round discs or snowflake-shaped cutouts. Leave them pure white, or dry-brush silver paint lightly across the raised areas so the design catches the light. These are one of the fastest ornaments to make in a batch of 20 or more.
10. Clay Bell Ornaments

Cut bell shapes and stamp a simple pattern across the bottom edge. Thread a small gold jingle bell onto the twine so it hangs just below the clay. Every time someone brushes past the tree, you get a little jingle.
11. Mini Wreath Ornaments

Roll a thin coil of clay, about the thickness of a pencil, and join it into a ring, smoothing the seam with a damp finger. Add tiny leaves pinched from clay or pressed with a leaf stamp, plus a few round berries. Paint the berries red and finish with a small twine bow.
12. Gingerbread House Row Ornaments

Cut a row of houses in different heights with cookie cutters or a knife: a tall townhouse, a little cottage, a church with a steeple. Stamp on windows and doors with the end of a straw or a small square stamp. Hang them in a row on red and white baker’s twine for a tiny Christmas village.
13. Clay Gingerbread People

Use a gingerbread cutter and press in faces and buttons with a toothpick. Leave them natural for a minimalist look, or paint them warm brown and add white “icing” squiggles with a paint pen. Kids love making these, and they look adorable on a kitchen tree.
Natural and Rustic Clay Ornaments
If your style leans woodland, farmhouse, or Scandi, these ornaments bring the outdoors onto the tree. They look beautiful left natural or with a simple white or gold wash.
14. Clay Acorn Ornaments

Roll an egg-shaped body and a flattened cap, then press a scrap of burlap into the cap for texture. Join the two with a dab of water and push a gold eye pin into the top before drying. Nestle six in a kraft box with shredded paper and you have a gift set ready to go.
15. Clay Deer or Stag Ornaments

A silicone mold gives you detailed antlers you’d never manage by hand. Dust the mold with a little cornstarch, press the clay in firmly, and pop it out carefully. Clean the edges with a damp brush and let it dry. Leave it natural, or paint it gold or copper for a showpiece ornament.
16. Round Ornaments with Pressed Botanicals

Lay a sprig of lavender, eucalyptus, fern, or pine on rolled clay and roll over it once. Lift the greenery away to reveal a perfect fossil-like print, then cut a circle around it. Leave it raw, rub in a little white or gold paint, or keep the real sprig pressed in for colour.
17. Scallop or Shell Ornaments

Press a real scallop shell into a ball of clay to capture its ridges, then trim the edge into a fan shape. Leave them matte, or brush on pearl or iridescent paint for a coastal Christmas tree that shimmers under the lights.
Modern Boho and Cottagecore Clay Ornaments
For a tree that feels fresh and a little unexpected, these modern shapes and whimsical mushrooms are the most-saved styles right now.
18. Cottagecore Mushroom Ornaments

Shape the cap and stem separately, then join them with a little water and a toothpick inside for strength. Push an eye pin into the cap while wet. Once dry, paint the cap red, add white dots with the end of a paintbrush, and speckle the stem with diluted brown. Hang on leather cord.
19. Boho Monstera Leaf Ornament

Print a small monstera leaf template, lay it on your clay, and trace around it with a craft knife, including the splits. Score the veins lightly with a toothpick. When it’s dry, flick watered-down black or brown paint from a stiff brush for a speckled finish, and hang it with jute and a wooden bead.
20. Abstract Arch or Teardrop Ornaments

Cut arches, teardrops, and ovals, then paint simple abstract designs once they’re dry: half-circles, dots, rainbows, and thin lines in sage, tan, terracotta, and black. Keep the palette to three or four colours and they’ll look like a designer set. Teardrop cutters make the shapes quick and even.
Tips for Getting the Best Results
These are the little things that make the difference between “homemade” and “where did you buy that?”
What makes clay ornaments look boutique-made
- Keep the thickness even: about 6 mm. Too thin cracks, too thick takes days to dry.
- Dry on parchment and flip: turn every ornament after 12 hours so both sides dry evenly and stay flat.
- Make holes before drying: a straw makes a clean hole. Drilling dry clay often splits it.
- Sand the edges: a quick pass with fine sandpaper or a nail file makes them look professional.
- Practise stamping on scrap: test pressure and spacing on a spare piece before stamping names.
- Fix cracks with slip: mix a little clay with water into a paste, fill the crack, and smooth it.
- Always seal: a matte or satin varnish protects paint and stops ornaments absorbing humidity.
Sealing is the step that makes them last for years. My guide on how to paint and seal Christmas clay ornaments shows exactly which finishes to use, and how to seal air dry clay covers every method if you want to compare.
Making Air Dry Clay Christmas Ornaments With Kids
Air dry clay is one of the best Christmas crafts for kids because there’s no oven, no heat, and nothing toxic. The handprint, gingerbread, star, and heart ornaments above are all easy wins for little hands.
How to run a clay ornament craft session
- Pre-roll the clay. Roll slabs ahead of time so kids can jump straight into cutting and stamping.
- Give each child a placemat of parchment. It keeps the table clean and makes moving ornaments to dry easy.
- Stick to big cutters. Stars, hearts, trees, and gingerbread people are easiest for small hands.
- You do the holes. Go around with a straw and add every hanging hole yourself.
- Paint on day two. Once they’re dry, set out paint and glitter for a second craft session.
- Write names and years on the back. A fine paint pen turns every ornament into a keepsake.
Looking for more ideas for your clay craft day? Try my air dry clay projects for beginners or these 15 useful air dry clay projects for everyday life.
Air Dry Clay Christmas Ornament FAQ
Here are the questions I get asked most about making clay ornaments, answered quickly.
QHow long do air dry clay ornaments take to dry?
Most 6 mm ornaments are fully dry in 24 to 48 hours. Thicker pieces, like footprints or acorns, can take up to 72 hours. They’re ready when they’re light in colour and no longer cool to the touch.
QWhy did my clay ornaments crack?
Usually they dried too fast or were rolled unevenly. Keep them away from heaters and sunny windows, flip them after 12 hours, and fill small cracks with a paste of clay and water.
QDo I need to seal air dry clay ornaments?
Yes. Air dry clay absorbs moisture, so a matte or satin varnish protects the paint and helps ornaments last for years in storage.
QCan you bake air dry clay to speed it up?
I don’t recommend it. Heat can cause cracking and warping. If you want an oven-bake option, look at polymer clay instead.
QHow thick should clay ornaments be?
About 6 mm is the sweet spot. It’s sturdy enough not to snap but light enough to hang on a branch without drooping.
QHow do I store clay ornaments after Christmas?
Wrap each one in tissue paper and store them in a sturdy box somewhere dry, like a closet shelf instead of a damp basement. Sealed ornaments will last for many Christmases.
Final Thoughts
Air dry clay Christmas ornaments are one of the simplest ways to fill your tree with meaning. Start with one batch of stars or hearts, add a personalized family ornament, and before long you’ll have a collection everyone looks forward to unpacking. If you love clay as much as I do, you’ll also enjoy my 25 Christmas air dry clay projects, these air dry clay gifts people will actually use, and my polymer clay Christmas ornaments and earrings.
Turn Your Crafts Into Income
If you love making things and want to earn from your blog, Pinterest, and handmade ideas, join me inside the Multi-Passionate Income Collective. Founding member pricing is open now and goes up in January.
JOIN THE COLLECTIVESave this for your next craft night. Pin it to your Christmas crafts board so it’s ready when the clay comes out.
Jennifer Dawn

Nice products. I would like to know if these items are for sale or how do I go about purchasing them.
I do not sell. I make for personal use and for gifts.
How do I purchase the clay gingerbread people and clay bell ornaments?
I do not sell the actual ornaments. I make for my own use and as gifts.