
FAQ
Are these truly low carb?
Yes. Using allulose or a low-carb sweetener blend keeps net carbs minimal. Cocoa and hazelnut extract add flavor without significant carbs.
If you add ground hazelnuts, the carb impact is still modest per serving.
Can I toast these over a fire?
They will soften and get a bit toasty, but sugar-free marshmallows don’t caramelize like classic ones. Use gentle heat and expect a faster melt. For s’mores-style fun, a brief toast with a kitchen torch works best.
Do I need a candy thermometer?
No.
This recipe is designed without specific temperature targets. Just bring the syrup to a smooth, gentle boil to dissolve the sweetener completely.
What if my mixture doesn’t whip up?
Check that the gelatin was fully bloomed and that the syrup was hot when added. Also ensure your bowl and whisk are clean and dry.
Keep whipping up to 10 minutes—volume often jumps in the final minutes.
Why use allulose instead of erythritol?
Allulose dissolves smoothly, resists crystallizing, and gives a soft, classic marshmallow texture. Erythritol can re-crystallize and feel gritty if not fully dissolved. A blend can strike a nice balance.
How big should I cut them?
Classic squares are about 1.25 to 1.5 inches, yielding 25–36 pieces from an 8×8 pan.
Smaller cubes are great for hot chocolate; larger ones are perfect for snacking.
Can I add chocolate chips?
Yes—use sugar-free dark chocolate chips. Fold in a small handful at the end, but note they may melt slightly in the warm mixture, creating chocolate swirls (which tastes great).
Do they need to dry out?
They set at room temperature within several hours. Leaving them uncovered overnight helps the surface dry just enough for clean handling, but don’t over-dry or they’ll lose their plushness.
Final Thoughts
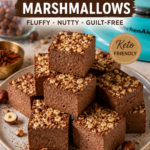
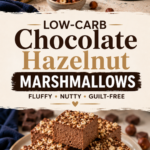
Low carb Chocolate Hazelnut marshmallows prove you don’t need loads of sugar for a soft, cloud-like treat.
With a handful of pantry ingredients and a stand mixer, you get something special: nutty, cocoa-rich bites that feel decadent yet stay on-plan. Keep a batch on the counter for coffee breaks, hot cocoa nights, or simple sweet cravings. Once you master the base, the flavor variations are endless—and all delightfully light on carbs.
Low Carb Chocolate Hazelnut Marshmallows – Fluffy, Nutty, and Guilt-Friendly

- Unflavored gelatin (3 envelopes or 21 g total)
- Allulose (1 cup / 200 g) or a 50/50 blend of allulose and erythritol
- Water (3/4 cup total; divided)
- Salt (a pinch)
- Vanilla extract (1 teaspoon)
- Hazelnut extract (1/2 to 1 teaspoon, to taste)
- Unsweetened cocoa powder (3 tablespoons for the mixture + more for dusting)
- Powdered low-carb sweetener (for dusting; powdered allulose or powdered erythritol/monk fruit blend)
- Optional: 1–2 tablespoons finely ground roasted hazelnuts (for extra flavor and texture; adds minimal carbs)
- Neutral oil or butter (for greasing the pan) or parchment paper
- Prep the pan: Line an 8×8-inch pan with parchment, leaving overhang for easy lifting.
Lightly grease the parchment to prevent sticking.
- Bloom the gelatin: Add 1/2 cup cold water to the bowl of a stand mixer (or a large mixing bowl). Sprinkle the gelatin evenly over the water. Let it sit for 5–10 minutes to soften.
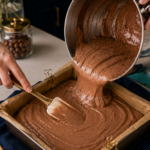
- Make the syrup: In a small saucepan, combine allulose (or your sweetener blend), 1/4 cup water, a pinch of salt, and 3 tablespoons unsweetened cocoa powder.
Whisk to break up any cocoa lumps.
- Heat to a gentle boil: Place the pan over medium heat. Stir until the sweetener dissolves and the mixture turns glossy and smooth. Let it come to a gentle boil for 1–2 minutes.
You don’t need a candy thermometer; just ensure everything is fully dissolved and fluid.
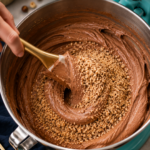
- Start whipping: Turn the mixer to low and begin mixing the bloomed gelatin. Carefully stream the hot cocoa syrup into the bowl while mixing on low.
- Whip to marshmallow stage: Increase speed to high and whip for 7–10 minutes, until the mixture is very thick, lukewarm, and forms soft, billowy peaks. It should hold ribbons on itself.
Beat in the vanilla and hazelnut extract during the last minute. Adjust hazelnut extract to taste.
- Optional nut boost: Fold in the finely ground roasted hazelnuts with a spatula. Work quickly—once thick, it sets fast.
- Pan and level: Scrape the mixture into the prepared pan.
Smooth the top with a lightly oiled spatula.
- Dust to prevent sticking: Sift a mixture of powdered sweetener and cocoa over the top in a thin, even layer.
- Set: Let sit at room temperature, uncovered, for 4–6 hours or overnight until firm and sliceable.
- Slice and coat: Lift the slab from the pan by the parchment. Use a sharp knife lightly greased with oil to cut squares. Toss the cut sides in more powdered sweetener/cocoa to prevent sticking.

Printable Recipe Card
Want just the essential recipe details without scrolling through the article? Get our printable recipe card with just the ingredients and instructions.