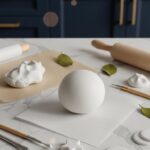

If you’re craving a creative project that doesn’t require a huge supply haul, homemade air dry clay is one of my favourite low-energy, high-reward DIYs. It’s soft, smooth, and perfect for small clay projects like ornaments, trinket dishes, coasters, and cable clips. This simple recipe uses ingredients you already have in your pantry and gives you a beautiful, workable clay that dries hard without a kiln or special tools.
Affiliate Disclaimer: This post may contain affiliate links, which means I may earn a small commission at no extra cost to you. I only share products I use, trust, and genuinely recommend.
Whether you’re looking for beginner air dry clay projects or want to experiment with custom textures, this homemade clay recipe gives you full control over consistency, softness, and color. It’s also an amazing option for family crafting, cozy weekend projects, or handmade gifts.
What Is Homemade Air Dry Clay?
Homemade air dry clay is a smooth, flexible crafting clay made from everyday kitchen ingredients. Unlike store-bought clay, it allows you to customize softness, elasticity, and drying time. It’s perfect for:
Mini clay art
Small clay projects
Ornaments
Useful everyday clay items
Beginner-friendly clay crafts
It’s also more cost-effective if you’re planning to make multiple pieces or want to create clay gifts for the holidays.

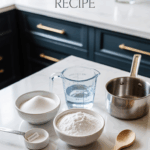
Ingredients You’ll Need
This recipe uses simple ingredients you already have at home.
You’ll need:
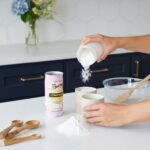
1 cup baking soda
½ cup cornstarch
¾ cup water
Optional: white acrylic paint (to make a bright white clay)
Optional: essential oils or extracts for a light, natural scent
You can double or triple this recipe depending on the size of the project.
Step-by-Step Homemade Air Dry Clay Recipe
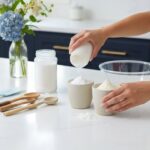
Step 1 — Combine the Ingredients
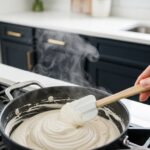
In a medium saucepan, whisk the baking soda and cornstarch together until fully mixed. Slowly pour in the water while stirring continuously.
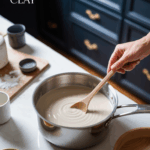
Step 2 — Cook the Mixture
Place the pan over medium heat. Stir constantly with a rubber spatula, scraping the bottom to prevent sticking.
As the mixture heats, it will thicken into a smooth paste and gradually turn into a dough.
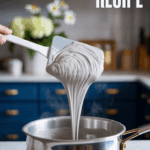
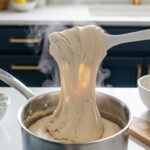
Step 3 — Remove From Heat
As soon as the dough pulls away from the sides of the pan and resembles soft mashed potatoes, remove it from heat. You don’t want it to overcook or it may become crumbly.
Step 4 — Cool the Dough
Transfer the dough onto a plate or silicone mat. Cover it with a damp cloth and allow it to cool completely before kneading.
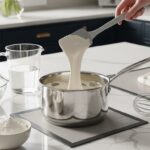
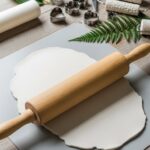
Step 5 — Knead Until Smooth
Once cool, knead the clay for several minutes until the texture is soft, silky, and easy to shape.
This is where homemade clay becomes magical. It should be smooth like store-bought air dry clay but more flexible and customizable.

How to Tell When the Clay Is Ready
Your homemade clay is ready when:
It holds its shape
It doesn’t crack when bent
It feels soft and pliable
It’s not sticky
If it feels too soft, add a sprinkle of cornstarch while kneading.
If it feels too dry, add a few drops of water.
Troubleshooting
Homemade clay is very forgiving, but here’s how to fix common issues:
The clay is too sticky
Add 1–2 tsp of cornstarch and knead again.
The clay is cracking
Add a few drops of water or a tiny bit of oil and knead.
The clay is crumbly
You may have overcooked it. Add warm water slowly until it softens.
The clay dries too fast
Roll it out between parchment sheets or use a damp cloth to slow the drying process.

How to Store Homemade Air Dry Clay
Store in an airtight container or sealed bag.
Press out any excess air before sealing.
It stays fresh for up to 2 weeks in the fridge.
Let it come to room temperature before using.
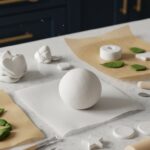
What You Can Make With This Recipe
This recipe is perfect for:
Mini clay art
Small clay projects
Air dry clay ornaments
Trinket dishes
Coasters
Textured tiles
Cable organizers
Name tags
Jewelry dishes
Ring cones
If you need ideas, check out my clay projects here:

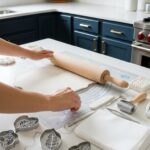
Creative Variations
Add paint: Mix white acrylic paint into the dough while kneading for a bright white finish.
Add texture: Use lace, leaves, or textured rollers to create patterns.
Add color: Use a few drops of food coloring or mica pigment for tinted clay.
Add botanicals: Lavender buds or dried petals pressed into the surface.
Safety & Notes
This clay is safe for adults and supervised kids, though not edible.
It air dries naturally in 24–48 hours.
For a smoother finish, lightly sand dried pieces with extra-fine sandpaper.
Seal finished pieces with a matte or satin varnish for durability.
The tools I personally use:
Clay Rolling Pin:
Silicone Craft Mat:
Clay Cutters:
Texture Rollers:
Craft Storage Jars: