: Witchy, Boho & Cute DIY Ideas 13")
If you love small clay projects that are both beautiful and functional, clay magnets are one of the most satisfying places to start. They’re quick to make, endlessly customizable, and perfect for using up leftover clay. Whether you’re experimenting with air dry clay crafts or diving into polymer clay magnets DIY, these ideas blend creativity with usefulness in a way that actually fits real life.
This guide walks you through cute clay magnets, themed inspiration, and exactly how to make clay magnets using both air dry and polymer clay, with ideas ranging from witchy and boho to playful food designs.
: Witchy, Boho & Cute DIY Ideas 14")
Some of the links on this site are affiliate links. That means if you click and buy, I may earn a small commission at no extra cost to you. No price hikes, no secret sacrifices, no summoning circles involved.
I only recommend tools and supplies I actually use, love, or would happily hoard in my craft drawer. Any commissions help fund more creative experiments, clay dust, and the occasional unnecessary-but-joyful art supply purchase.
Thanks for supporting my work and keeping this creative chaos well-fed.
Why Clay Magnets Are One of the Best Small Clay Projects
Clay magnets check every box when it comes to useful clay projects:
They’re beginner-friendly easy clay models
They work with air dry clay or polymer clay
They’re fast to finish and easy to gift
They double as decor and organization
If you’re looking for clay useful ideas that don’t end up hidden in a drawer, handmade fridge magnets are a clear winner.
They’re also ideal if you love mini clay art or want to explore mini clay ideas without committing to large sculptures.
: Witchy, Boho & Cute DIY Ideas 15")
Air Dry Clay vs Polymer Clay for Magnets
Before we dive into ideas, here’s a quick breakdown to help you choose the right material.
Air Dry Clay Magnets
Best for:
Air dry clay magnets DIY
Casual crafting
Cute air dry clay ideas
Kids or low-tool setups
Air dry clay is perfect for easy air dry clay projects, especially if you want something lightweight and quick. Just remember to seal your finished pieces.
Polymer Clay Magnets
Best for:
Detailed designs
Long-lasting polymer clay fridge magnets
Selling or gifting
Mini polymer clay ideas
Polymer clay gives you sharper detail and durability, making it ideal for polymer clay magnets ideas that need crisp detail.
: Witchy, Boho & Cute DIY Ideas 16")
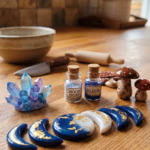
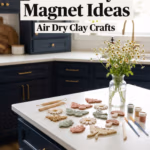
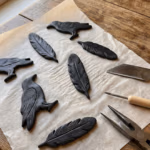
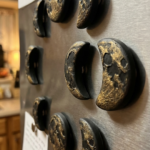
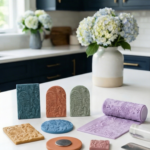
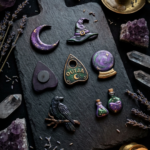
Witchy Clay Magnet Ideas
Witch-inspired designs are some of the most popular cute clay magnets, especially for fall and year-round mystical decor.
Ideas include:
Mushrooms and toadstools
Witch hats, brooms, and cauldrons
Moon phases, stars, suns, and third eyes
Crystal balls and planchettes
Raven skulls and angel wings
These work beautifully as polymer clay magnets because of the fine details, but they’re also adaptable as air dry clay fridge magnets with a softer, folk-art feel.
: Witchy, Boho & Cute DIY Ideas 17")
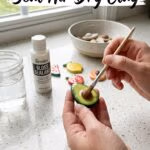
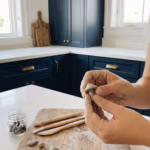
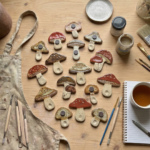
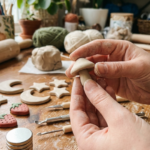
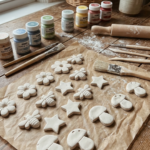
How to Shape Mushrooms Out of Clay
Mushrooms are one of the easiest and most satisfying shapes to make with clay, which is why they show up everywhere in cute clay magnets, fairy garden pieces, and whimsical cottage-core decor. Their simple structure makes them beginner-friendly, but small details like texture and color can make them look surprisingly realistic.
Start by rolling a small ball of clay between your palms to form the mushroom cap. Once the ball is smooth, gently press the bottom against your work surface so it sits flat. To create the classic mushroom dome, lightly round the top with your fingers. If you want a flatter toadstool style, press the top slightly to widen the cap.
Next, roll a short cylinder for the stem. Keep the top of the stem slightly wider than the bottom so the cap has something to sit on. Attach the cap to the stem by pressing them together gently. If you’re using polymer clay, you can lightly score the two pieces and press them together so they bond more securely.
To add charm and realism, use a needle tool, toothpick, or sculpting tool to create subtle details. Lightly texture the underside of the cap with tiny lines to mimic mushroom gills, or add small indentations on top for a whimsical toadstool look. If you’re making magnets or decorative pieces, you can also flatten the back slightly so they sit nicely against the surface.
For extra personality, try shaping different mushroom styles. Make tall skinny stems with tiny caps for woodland mushrooms, chunky stems with wide caps for classic toadstools, or tiny clusters of mini mushrooms grouped together for a magical forest vibe.
Once shaped, your mushrooms are ready to bake (if using polymer clay) or dry (if using air-dry clay) before painting or sealing. Adding paint, glaze, or a glossy sealant later can really bring out the textures and make your clay mushrooms look polished and finished.
Or make a flat version with cutters like these.
: Witchy, Boho & Cute DIY Ideas 18")
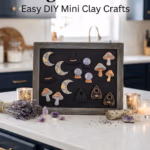
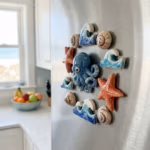
Boho & Nature Mini Clay Ideas
If you lean more organic and earthy, boho designs are perfect mini clay ideas that still feel elevated.
Try:
Bees and butterflies
Pansy flowers and botanical shapes
Wooden spoons and nature symbols
Octopus and ocean-inspired forms
These are ideal air dry clay gifts and translate well into cute fridge magnets DIY for kitchens, studios, and creative spaces.
: Witchy, Boho & Cute DIY Ideas 19")
Cute Food Clay Magnets (Always a Hit)
Food magnets are playful, nostalgic, and incredibly giftable.
Popular cute clay magnets include:
Donuts with icing and sprinkles
Macarons in pastel colors
Strawberries and fruit
Pickles and novelty foods
These are perfect easy polymer clay ideas and also work as homemade clay magnets when sealed properly.
How to Make Clay Magnets (Air Dry or Polymer)
This simple process works for both materials.
Supplies
Air dry clay or polymer clay
Strong neodymium magnets
Craft glue or epoxy
Acrylic paint (optional)
Sealant (especially for air dry clay)
: Witchy, Boho & Cute DIY Ideas 20")
Steps
Shape your clay design and smooth edges
Let air dry clay fully cure or bake polymer clay according to instructions
Paint if desired and allow to dry
Seal for durability
Glue magnet securely to the back
This method works for clay fridge magnets DIY, air dry clay fridge magnets, and polymer clay fridge magnets alike.
: Witchy, Boho & Cute DIY Ideas 21")
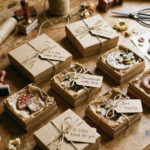
Why Clay Magnets Make Great Gifts
Clay magnets are underrated as gifts, but they’re incredibly versatile.
They work well as:
Air dry clay gifts
Stocking stuffers
Housewarming presents
Craft fair items
Add-ons to larger handmade bundles
Because they’re small, they’re also perfect small clay projects when you want something meaningful without a big time commitment.
: Witchy, Boho & Cute DIY Ideas 22")
How to Seal Clay Magnets So They Last
If you’re using air dry clay or painted polymer clay, sealing your finished pieces helps protect them from moisture, scratches, and everyday kitchen life.
Magnets live on refrigerators, which means they’re constantly being touched, bumped, and occasionally splashed. A simple sealant step makes a big difference in how long your mini clay art lasts.
When You Should Seal Clay
Sealing is recommended when:
You use air dry clay
Your clay pieces are painted
You want a glossy or satin finish
You’re making magnets as gifts or items to sell
Polymer clay itself is already durable, but many people still seal it to protect paint details or add shine.
Best Sealants for Clay Magnets
Common options include:
Acrylic Sealer Spray
Great for quick coverage and even finish. Works well for batches of magnets.
Brush-On Acrylic Sealer
Good for precise coverage and small details.
Gloss Varnish
Perfect for food magnets like donuts or fruit where a shiny finish makes them look more realistic.
Matte Sealer
Ideal for witchy or boho designs where you want a natural or earthy look.
How to Seal Your Clay Magnets
Make sure the clay is fully cured or baked.
Paint the design if desired and let it dry completely.
Apply a thin coat of sealant.
Allow it to dry fully.
Add a second coat if needed for durability.
Always apply thin layers rather than thick ones, which helps prevent streaks or cloudiness.
Once sealed, your magnets are ready for everyday use.
How to Bake Polymer Clay for Magnets
Polymer clay must be baked in order to harden properly. The baking process is simple, but following the correct temperature and time ensures your clay pieces stay strong and durable.
Basic Polymer Clay Baking Guidelines
Most polymer clay brands bake at:
275°F (130°C)
The typical baking time is:
15–30 minutes per ¼ inch thickness
Always check the instructions on your specific clay brand, as baking temperatures can vary slightly.
Step-by-Step Baking Process
Preheat your oven to the recommended temperature.
Place clay pieces on a baking tray lined with parchment paper.
Space pieces slightly apart so heat circulates evenly.
Bake according to thickness guidelines.
Allow pieces to cool completely before handling.
Polymer clay becomes fully durable after cooling, so avoid bending or testing pieces while they are still warm.
Helpful Baking Tips
Use parchment paper or a ceramic tile for even heat.
Avoid baking directly on metal trays without lining.
Use an oven thermometer if you want consistent results.
Do not exceed the recommended temperature.
Properly baked polymer clay magnets can last for many years.
: Witchy, Boho & Cute DIY Ideas 23")
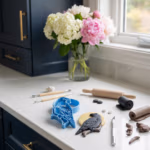
Tools That Make Clay Magnets Easier to Create
You can absolutely make clay magnets with just your hands, but a few simple tools make the process faster, cleaner, and more precise.
These tools are especially helpful if you plan to make multiple magnets or sell them at craft fairs.
Essential Clay Tools
Small Clay Rolling Pin
Helps flatten clay evenly before cutting shapes.
Sculpting Tools
Useful for carving texture, shaping details, and smoothing edges.
Clay Blades
Perfect for cutting clean edges and trimming shapes.
Texture Tools
These create patterns like:
wood grain
fabric texture
botanical details
stone effects
Even household items like forks or lace can add texture.
: Witchy, Boho & Cute DIY Ideas 24")
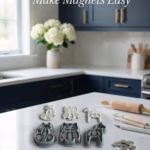
Cutters That Speed Up the Process
Cutters are one of the easiest ways to create consistent shapes.
Popular options include:
Moon phase cutters
Mushroom cutters
Flower cutters
Mini circle cutters
Star cutters
Heart cutters
These make it easy to create uniform magnets quickly, which is especially helpful if you’re making batches for gifts or selling handmade items.
Other Helpful Supplies
You may also want:
Strong neodymium magnets
Craft glue or epoxy
Acrylic paint for details
Fine paint brushes
Clear sealant
These simple tools allow you to create magnets that look polished while still keeping the handmade charm.
: Witchy, Boho & Cute DIY Ideas 25")
Small Clay Projects That Grow With You
Clay magnets are often the first project people try when learning to work with clay.
They’re small, quick to finish, and endlessly customizable. Over time, many people move from simple shapes into detailed mini clay art and themed collections.
Whether you’re making air dry clay magnets DIY, experimenting with polymer clay magnets ideas, or creating cute handmade gifts, this craft grows with your creativity.
And the best part?
Your fridge becomes a tiny rotating gallery of things you made yourself.
Beginner Clay Magnet Starter Kit (Tools + Supplies)
If you’re new to clay crafting, you don’t need a giant craft room or expensive equipment to get started. A small set of reliable tools can help you create cleaner shapes, smoother finishes, and magnets that actually last.
This simple starter kit covers the basics for both air dry clay magnets DIY and polymer clay magnets ideas, making it easy to start experimenting without overwhelm.
Clay Options
Air Dry Clay
Air dry clay is perfect for beginners because it cures naturally without baking. It’s great for:
Simple shapes
Folk-art style magnets
Quick crafting sessions
It’s lightweight and easy to shape, but it does need sealing once finished.
Polymer Clay
Polymer clay is the best option if you want:
Crisp details
Durable magnets
Professional-looking mini designs
Because it’s baked to cure, polymer clay magnets are usually stronger and more resistant to moisture.
Magnets
For fridge magnets, the most reliable option is strong neodymium magnets.
Look for:
Thin but strong pull strength
Smooth edges for easy gluing
These hold notes, photos, and recipe cards much better than standard craft magnets.
Clay Tools
You don’t need many tools to start, but a few basic ones make crafting much easier.
Mini Rolling Pin
Helps flatten clay evenly before cutting shapes.
Clay Sculpting Tools
These are used to:
Smooth edges
Add textures
Shape small details
Most starter kits include several useful tool shapes.
Clay Blade
A thin blade makes it easier to cut clean edges and trim shapes neatly.
Shape Cutters
Cutters help create consistent shapes quickly, especially when making batches of magnets.
Popular options include:
Mini circle cutters
Star cutters
Flower cutters
They’re especially helpful if you’re making polymer clay magnets DIY or planning themed magnet sets.
Paint and Detail Supplies
Many clay magnets look great unpainted, but paint can add personality and detail.
Helpful supplies include:
Acrylic craft paints
Fine detail brushes
Metallic paints for accents
Dotting tools for patterns
These are perfect for details like donut sprinkles, mushroom spots, moon highlights, or tiny eyes on cute designs.
Sealers and Finishes
If you’re using air dry clay or painting your magnets, sealing the surface helps protect your work.
Common options include:
Matte acrylic sealer
Gloss varnish
Satin finish sealer
Matte finishes work well for boho and witchy magnets, while glossy finishes are perfect for food designs like donuts or fruit.
Adhesives
To attach magnets securely, you’ll want a strong glue.
The most reliable options are:
Industrial craft glue
Two-part epoxy
These create a much stronger bond than basic school glue.
Allow the glue to cure fully before placing magnets on your refrigerator.
Your Clay Magnet Supply Checklist
To start making magnets at home, you only need:
Air dry clay or polymer clay
Craft glue or epoxy
Sculpting tools
Clay cutters
Acrylic paint (optional)
Clear sealant
- Texture Rollers
With just these supplies, you can create dozens of unique magnets.
Start Small, Create Often
Clay magnets are one of those crafts that grow with you. You can start with easy air dry clay projects, move into polymer clay magnets ideas, and eventually build full themed collections.
If you love DIY clay crafts, enjoy mini clay art, or want more clay useful ideas that actually get used, magnets are the perfect place to focus your creativity.
Once you start, you’ll never look at your fridge the same way again.