
Air dry clay projects are one of the most affordable ways to create beautiful, high-end looking home decor from scratch — no kiln, no experience, and no big budget required.
If you’ve been seeing air dry clay projects all over Pinterest and wondering whether it’s actually as easy as it looks — it is. I’m not saying that to be encouraging. I’m saying it because clay is genuinely one of the most forgiving creative mediums you can pick up, and the results look like you spent serious money when you spent almost nothing.
This guide is for complete beginners. No kiln, no wheel, no studio, no experience required. Just a bag of clay, your hands, and a few basic tools you probably already own.
Here are ten projects worth starting with — practical, beautiful, and achievable on your very first try.
This post contains affiliate links. If you purchase through them, I may earn a small commission at no extra cost to you. I only share products I genuinely love and would recommend regardless. Thank you for supporting this space.
Honestly, air dry clay might be the best creative hobby you haven’t tried yet.
- The learning curve is almost flat. Unlike resin, painting, or embroidery, air dry clay gives you immediate, tangible results that look polished even when you’re figuring things out as you go. If something isn’t working, you reshape it. That’s it.
- The cost is almost laughably low. A single bag of air dry clay costs between five and fifteen dollars and will give you more projects than you expect. Most of the tools you need are already in your kitchen drawer. ( Or you can make your own air dry clay! )
- The results photograph beautifully and feel genuinely handmade in the best possible way. These are the kinds of pieces that people pick up at your house and ask where you bought them.
Here’s what you’ll need before you start.
A bag of air dry clay — Crayola, DAS, or La Doll are all beginner-friendly. A smooth non-stick work surface — a silicone mat, a piece of parchment paper, or a ceramic tile all work well. A rolling pin or a smooth glass to roll your clay flat. Basic sculpting tools — a butter knife, a toothpick, and a straw will take you through most of these projects. Sandpaper in fine grit for smoothing dried pieces. Acrylic paint and a sealant for finishing — Mod Podge or a clear acrylic spray both work.
Optional but worth having: small rubber stamps or lace fabric for texture, a circle cutter or cookie cutters for clean shapes, and a shallow bowl or plate to use as a mold.
Here’s how each project comes together.
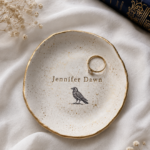
PROJECT 01 — RING DISH Roll your clay to about a quarter inch thickness. Cut a circle roughly four inches across. Drape it over an upturned bowl or press it gently into a small bowl to shape the curve. Let it dry completely — usually 24 to 48 hours — then sand any rough edges, paint, and seal. This is the project that gets everyone hooked. It takes about ten minutes of hands-on time and looks like something from an Anthropologie shelf. You can add more detail with clay stamps or clay transfer paper. Another option is to decoupage on beautiful napkins.

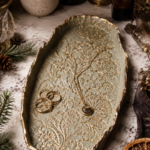
PROJECT 02 — TEXTURED TRINKET TRAY Roll your clay flat and press a piece of lace, a rubber stamp, or even a crinkled piece of tin foil across the surface for texture. Cut into a rectangle or organic shape. Fold the edges up slightly to create low walls. Dry, sand, and finish with gold paint on the raised texture details. This one is deeply satisfying because the texture does all the visual work for you.

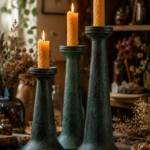
PROJECT 03 — TAPERED TAPER CANDLE HOLDER Roll a thick cylinder of clay and use your fingers or a round object to hollow out a well in the center just wide enough to hold a taper candle. Smooth the outside and let dry fully before adding any candle. These look stunning in groups of three at varying heights and photograph beautifully with a dark, moody aesthetic.

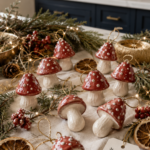
PROJECT 04 — MUSHROOM ORNAMENTS OR WALL HANGINGS Shape a simple mushroom cap between your palms — a slightly flattened dome. Add a short cylinder stem. Press a small hole through the top with a toothpick before drying for hanging. Once dry, paint in earthy tones, deep reds, or the classic white spotted cap.

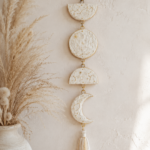
PROJECT 05 — MOON PHASE WALL HANGING SET Roll clay flat and cut a series of moon shapes — full circle, three-quarter, half, quarter, and crescent. Pierce a small hole at the top of each piece. Once dry, paint in white, cream, or gold and string together on a piece of cord or leather lacing. This project took me longer to dry than to make, and it looks like something that costs forty dollars in a boutique.

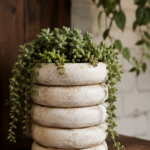
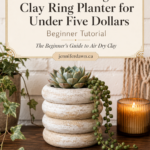
PROJECT 06 — HERB OR SUCCULENT PLANTER Coil method: roll long ropes of clay and stack them in a spiral to build the walls of a small planter. Smooth the inside walls with a damp finger. Allow to dry fully — this one takes longer due to thickness. Seal the inside well before adding any plant or water. These look extraordinary with a whitewash or terracotta-tone finish.

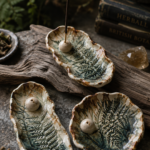
PROJECT 07 — INCENSE HOLDER Roll a small log of clay and use a skewer or thick needle tool to press one or several holes where your incense sticks will sit. Keep the base wide enough to be stable. Let dry completely. Paint and seal. This is the fastest project on the list — under five minutes of working time — and it’s genuinely useful every single day.

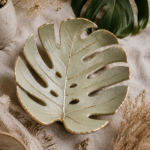
PROJECT 08 — LEAF IMPRESSION DISH Press a large fresh leaf — a fig leaf, a monstera leaf, or any leaf with strong veining — firmly into a flat piece of rolled clay. The veins will leave a beautiful impression. Cut around the leaf shape and drape gently over a bowl to dry with a slight curve. Remove the leaf once the clay holds its shape but before fully dry. The finished piece will have the full vein structure of the leaf pressed into the surface. Paint in white or sage and gold for a piece that looks extremely intentional.

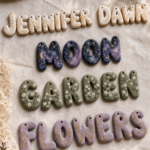
PROJECT 09 — INITIAL OR WORD TILES Roll clay flat and cut into a simple rectangle or square. Use a stamp set, a letter cutter, or a toothpick to press letters or a short word into the surface before it dries. Sand smooth when dry and paint in a contrasting color, wiping back the surface so the letter fill stays while the background reads clean. These make genuinely beautiful gifts and are wildly easy to make once you understand the technique.

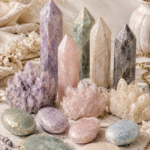
PROJECT 10 — CRYSTAL OR GEM SHAPED DECORATIVE OBJECTS Pinch and shape your clay into angular faceted gem shapes — think raw crystal points or cut gemstone forms. These don’t need to be perfect; irregular facets look more authentic. Let dry and paint in amethyst purple, obsidian black, rose quartz pink, or a gold metallic. Group several together in a bowl or on a shelf and they look like a curated crystal collection. I find using a mold like this to be easier though.

Things I learned while making these projects.
- Dry time is non-negotiable. Every crack I’ve ever gotten in a finished piece happened because I rushed the drying. Give clay the full 24 to 48 hours before sanding or painting, and 72 hours for anything thick.
- Keep your clay wrapped between sessions. Air dry clay does exactly what the name says. Any piece left uncovered will begin to dry and crack before you’re done working with it. A damp paper towel wrapped around unused clay and sealed in a bag will keep it workable for weeks.
- Smooth cracks with a wet finger before the clay dries. A damp fingertip will smooth almost any crack or seam while the clay is still soft. After it dries, you’re sanding.
- Sand in multiple passes. Start with a medium grit sandpaper and finish with a fine grit. The difference between a piece that looks handmade and one that looks handcrafted is almost entirely in the sanding.
- Seal everything before painting if you want clean color. A thin layer of Mod Podge on the dried raw clay before you paint creates a much smoother surface to work on and helps your paint layer look intentional rather than absorbed.
- Two thin coats of sealant at the end beats one thick coat every time. Thick sealant goes cloudy. Thin coats stay clear.
Prep tips (because future you will thank you).
- Weigh out or portion your clay for each project before you begin. Once the bag is open, the whole thing wants to dry. Having your portions ready means you open and close the bag as few times as possible.
- Set up a dedicated drying space where pieces won’t be disturbed. Flat pieces can warp if they dry on a surface that isn’t completely level.
- Batch your projects. If you’re making ring dishes, make four at once. The working time is the same; you just end up with more beautiful things.
- Paint and seal on the same day if possible. Once you’re in the zone with a color palette and finish, the projects go fast and the results are cohesive.

Storing and caring for your finished pieces.
STORING UNFIRED PIECES: Keep unused clay sealed in its original bag with a damp paper towel inside. Store in a cool, dry place away from direct sunlight or heat vents. Properly stored clay stays workable for months.
CARING FOR FINISHED PIECES: Air dry clay is not waterproof even when sealed, so keep finished pieces away from prolonged moisture. Wipe with a dry or barely damp cloth. Planters should be sealed inside and out with a waterproof sealant and checked regularly.
IF SOMETHING BREAKS: Mix a small amount of fresh clay with water to create a slip — a paste consistency — and use it as a natural adhesive to repair cracks or broken pieces before they fully dry. For dry pieces, a strong clear craft glue works well.
More easy clay projects worth trying next.
- How to Make Air Dry Clay Croissant Magnets That Look Almost Real (Step by Step)
- How to Make Polymer Clay Donut Fridge Magnets
- How to Make Air Dry Clay Fridge Magnets
- Creative Clay Crafts That Are Surprisingly Easy to Make
- Spring Clay Crafts That Are Cute, Creative, and Sellable | DIY Clay Ideas
- Clay Magnets You’ll Want to Make and Keep: Witchy, Boho and Cute DIY Ideas
Whether this is your first time touching clay or you’ve been curious about it for months, these ten projects are the best possible starting point. Start with the ring dish or the incense holder — both are under ten minutes and will show you immediately what clay can do in your hands.