
There is a specific kind of satisfaction that comes from making something so realistic that people have to look twice.
These polymer clay donut magnets are exactly that kind of project. Tiny, detailed, and almost absurdly cute — they look like someone shrunk a real bakery display down to fridge magnet size. And the technique behind them is far more approachable than the result suggests.

Heads up — this post contains affiliate links, which means I may earn a small commission if you purchase through one of my links, at no extra cost to you. I only ever recommend products I actually use or would genuinely buy myself. It’s one of the ways I keep this little corner of the internet running, and I appreciate your support more than you know.
Polymer clay donut magnets sit in a sweet spot between satisfying craft project and genuinely useful finished product. As a self-care afternoon activity they are the kind of thing you can lose yourself in completely — mixing colors, shaping, glazes, placing tiny sprinkles one by one — with a coffee on the side and nothing else demanding your attention. As a handmade gift, a set of three or four nestled in a small box is one of those presents that makes people genuinely delighted in a way a store-bought gift rarely does. And if you sell at craft fairs or on Etsy, food-themed magnets are consistently one of the strongest performing small products on a table — approachable price point, high visual impact, and the kind of thing people pick up and cannot put down.
This tutorial walks through the entire process from start to finish. We are covering clay color mixing, shaping your donut base, creating the liquid clay glaze that makes these look almost edible, adding sprinkle details, baking, and attaching the magnet hardware. By the end you will have a technique you can apply to endless flavor variations — and a new favourite thing on your fridge.
Let’s get into it
Polymer clay is an oven-bake clay, which means it stays soft and workable until you bake it — giving you as much time as you need to get every detail right before anything is permanent. It also means the finished pieces are significantly more durable than air dry clay, making it ideal for something like a fridge magnet that gets handled regularly.
For the clay work:
- Polymer clay in the following colors: tan or ecru for the dough base, white, pink, chocolate brown, and a selection of brights for sprinkle colors. Sculpey III and Premo are both excellent beginner-friendly brands widely available at craft stores and online.
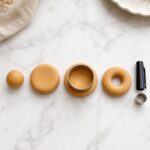
- A clay-dedicated acrylic roller — keep this separate from any kitchen tools
- Two circle cutters in different sizes — one for the outer donut shape and one for the center hole. A bottle cap and a pen cap work perfectly as a free alternative.
- A smooth clay-safe work surface — a ceramic tile or a sheet of glass works well
- A toothpick or tweezers for detail work and sprinkle placement
- A sheet of parchment paper for your work surface and baking
For the glaze:
- Liquid polymer clay — Sculpey Translucent Liquid Clay or Kato Liquid Polyclay. This is the ingredient that creates the realistic glazed finish and it is genuinely the magic of this whole project.
- Small mixing containers — old bottle caps or condiment jar lids work perfectly
- Alcohol ink, dry pastels or oil paint in pink, chocolate brown, and white for tinting your glazes
For finishing:
- A fine detail brush
- Gloss varnish or Sculpey glaze for a final shine coat post-baking
- Neodymium disc magnets, 20mm diameter, 3mm thick, N35 or N52 grade — see the hardware section below for why this specific detail matters
- E6000 craft adhesive
- Wax paper for the curing stage
A Note on Color Mixing
Before you start shaping, spend a few minutes on your clay colors. Polymer clay straight from the block is often more saturated than you want for realistic food — real donut dough is not a flat tan, it has warmth and depth. This is also where dry pastels come in handy for shading and depth.
For your dough base, mix a small amount of tan or ecru clay with a tiny pinch of brown and an even tinier pinch of orange. Work it thoroughly until fully blended with no streaks. The goal is a color that reads as baked dough — warm, golden, and slightly uneven in tone.
For your glaze colors, you will tint your liquid polymer clay rather than using solid clay. Set those aside for now — we will come back to them in Step 5.
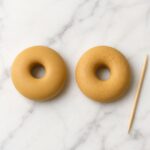
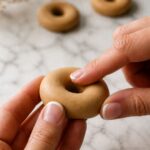
Step 1: Shape Your Donut Base
Take a piece of your mixed dough-colored clay roughly the size of a large marble. Roll it between your palms until it forms a smooth, even ball with no cracks or seams visible on the surface.
Place the ball on your work surface and press it down gently with two fingers until it forms a disc shape approximately ½ inch thick. A little more height than you might expect is correct here — the donut will look far more realistic with a slight puff to it rather than being flat.
Use your larger circle cutter to cut the outer edge of the donut, then use your smaller cutter — or a pen cap — to cut the hole in the center. Press straight down and lift cleanly without twisting. If you do not have a cutter, these are pretty simple to form by hand.
Remove the center circle and set your donut ring aside. Repeat until you have your full batch.

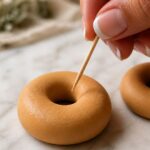
Step 2: Shape and Refine
Pick up each donut ring and very gently squeeze it between your fingers all the way around, rotating as you go. This does two things — it closes any rough edges left by the cutters and gives the donut that slightly uneven, handmade bakery character that makes it look real rather than machine-made.
Use your fingertip to very gently dome the top surface. Real donuts are not flat on top — they have a soft rise in the center that catches glaze in a particular way. A subtle dome makes a visible difference in the finished result.

Step 3: Add Surface Texture
This optional step takes thirty seconds and adds meaningful realism. Take a toothpick and very lightly drag it across the surface of the donut in short random strokes — not deep grooves, just barely-there surface marks. This mimics the slightly uneven texture of fried dough and helps the glaze settle in a way that looks completely natural. Another good option is to crumple up a small ball of tin foil and use this to create texture.
Go lightly. You want texture that reads in person and in photographs without looking like deliberate scratching.

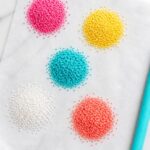
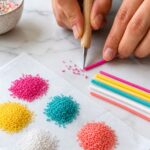
Step 4: Make Your Sprinkles
Make your sprinkles now, before you move on to glazing, so they are ready to apply the moment your glaze goes on.
Roll tiny thin logs of brightly colored clay — hot pink, yellow, turquoise, white, coral — and use a craft knife or the edge of a clay tool to cut them into tiny even segments approximately 2–3mm long. Place them on a piece of parchment as you go.
Have a generous pile of each color ready before you start glazing. You will use more than you expect and running out mid-glaze means the glaze will start to skin over while you make more.

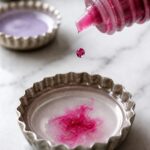
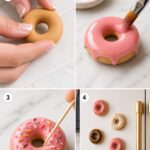
Step 5: Mix and Apply the Liquid Clay Glaze
This is the step that makes people stop and look twice. Liquid polymer clay tinted with a small amount of color creates a glaze that flows, drips, and sets with a realistic shine that solid clay cannot replicate. It is one of the most satisfying techniques in the whole polymer clay world.

Mixing your glazes:
Pour a small amount of liquid polymer clay into each mixing container. Add color a tiny amount at a time and mix thoroughly before adding more — it is very easy to overshoot your color with alcohol ink:
- Strawberry pink: A small drop of pink alcohol ink mixed until smooth and even
- Chocolate: Brown with a hint of black until rich and deep
- Classic glazed: White tinted very slightly with yellow and a touch of pink for that just-set vanilla icing look
- Matcha: Green mixed with white for a muted, sophisticated finish
You are aiming for a consistency similar to honey — thick enough to sit on the donut without running straight off, fluid enough to flow naturally toward the edges.
Applying the glaze:
Use a small brush to scoop a small amount of glaze and place it in the center of the top surface of your donut. Gently push it outward toward the edges, encouraging it to drip slightly over the sides in a few places. Do not cover the entire donut — leaving some of the dough-colored sides visible is what makes it look realistic rather than painted.

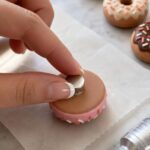
Step 6: Add the Sprinkles
While the glaze is still wet and tacky, add your sprinkles. Use a toothpick to pick up individual pieces and press them gently into the surface — they will sink in slightly and hold exactly where you place them.
Work one donut at a time rather than glazing the whole batch first. Liquid polymer clay develops a skin relatively quickly and sprinkles will not adhere as cleanly once that happens.
For a more polished, curated look, limit yourself to two or three sprinkle colors per donut rather than using all of them at once. A hot pink glazed donut with white and coral sprinkles photographs more beautifully than one with every color competing for attention.

Step 7: Bake
Place your finished unbaked donuts carefully on a parchment-lined baking tray. Handle gently — the liquid clay glaze is still wet and sprinkles can shift with rough movement.
Bake according to your clay brand’s instructions. For both Sculpey III and Premo the standard temperature is 275°F / 130°C for 30 minutes per ¼ inch of thickness.
Leave your donuts on the tray until they reach room temperature completely before touching them. Polymer clay is slightly flexible straight out of the oven and firms to its final hardness as it cools. Handling too soon risks distorting the shape and the glaze surface.
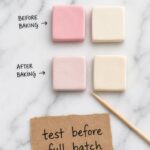
A note on color shifting: Polymer clay can shift slightly during baking — lighter colors may yellow very slightly and some pinks can change tone. A quick test bake with a small piece of each color before committing to a full batch is worth the extra few minutes, especially for your glaze colors.

Step 8: Final Gloss Coat
Once your donuts are completely cool, apply a thin coat of gloss varnish or Sculpey Glaze over the glazed top surface only. This deepens the shine and gives the finished piece that wet, freshly-glazed look that reads so convincingly in photographs and in person. Another option that really adds to the gloss and overall longevity of your finished piece is to coat it is resin.
Apply with a soft brush in a single smooth stroke and allow to dry completely before moving on to the hardware. One thin coat is all you need — over-applying can cause clouding or bubbling.

Step 9: Attach the Magnet Hardware
This is the detail that determines whether your magnets stay on the fridge or eventually work their way loose — and it comes down almost entirely to the hardware you choose.
Use neodymium disc magnets, 20mm diameter, 3mm thick, N35 or N52 grade. These are substantially stronger than the standard ceramic disc magnets found in most craft kits, and for a piece with the mass of a polymer clay donut — which has more weight than a simple flat cut shape — you need that extra pull strength.
Apply a small amount of E6000 adhesive to the face of the magnet, press it firmly and centrally onto the flat bottom of your donut, and set it right-side up on a sheet of wax paper to cure.
Allow a full 24 to 48 hours before putting it on the fridge. E6000 reaches its maximum bond strength at the 48-hour mark. Testing it too soon is the most common reason handmade magnets eventually come loose.
Displaying, Gifting and Selling Your Donut Magnets
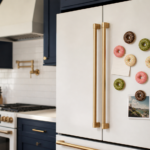
On your fridge: A cluster of mixed flavors — strawberry, chocolate, and classic glazed grouped together — looks like a tiny bakery display. These are the kind of magnets that become a talking point in any kitchen.

As a handmade gift: Three or four donut magnets in a small clear-lidded box or a kraft gift box with a window is one of the most charming handmade gifts for a baker, a food lover, or anyone who appreciates something genuinely handcrafted. Add a small kraft tag and it is complete. Works beautifully for birthdays, housewarmings, teacher appreciation, and stocking stuffers.

For craft fairs and Etsy: Food-themed polymer clay magnets are one of the strongest performing small products at craft markets. They stop people in their tracks, they are easy to pick up and examine, and customers almost always buy more than one flavor. Pricing three for $15 or four for $18 works well at markets. For Etsy, individual listings at $5–$6 each or sets of four at $18–$22 perform consistently well. Photographing them on a clean white surface with a few real sprinkles scattered around makes for a strong, clean product listing image.

Flavor Variations to Try
Once you have the base technique down the flavor possibilities are genuinely endless:
- Blueberry — deep purple glaze with tiny white sprinkles
- Lemon — pale yellow glaze with no sprinkles for a clean, sophisticated look
- Cookies and cream — chocolate glaze with tiny white clay chunks pressed in before baking
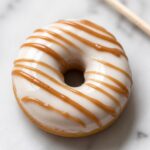
- Caramel drizzle — classic glaze base with a thin caramel-toned line drizzled over the top with a toothpick
- Matcha — muted green glaze with tiny white sesame seed dots made from rolled clay
Troubleshooting
My glaze is too runny and dripping completely off the sides. Your liquid clay is too thin or you have applied too much at once. Knead a very small amount of raw solid clay into the liquid clay to thicken it, or apply a thinner layer and give it a moment to settle before adding sprinkles.
My sprinkles sank into the glaze and disappeared. The glaze layer is too thick. Apply a thinner coat so the sprinkles sit on the surface rather than sinking through it.
My pink glaze turned orange during baking. This is a common polymer clay challenge with warm-toned pinks. Switch to a cooler-toned pink in your next batch, or reduce your oven temperature by 10 degrees and check a few minutes earlier. An oven thermometer is worth having — most home ovens run slightly hotter than the dial indicates.
My donuts cracked after baking. Usually caused by air bubbles in the clay during shaping or by an oven temperature that is too high. Condition your clay more thoroughly before shaping and verify your oven temperature with a thermometer before your next bake.
The magnet is not holding on the fridge. Upgrade to an N52 grade neodymium magnet and allow the full 48-hour E6000 cure before testing on the fridge.
What to Make Next
- [How to Make Air Dry Clay Fridge Magnets — Beginner Tutorial →] The foundational magnet post — start here if you are new to clay magnets entirely
- [Polymer Clay Fruit Magnets: Raspberries, Blueberries & Lemons →] Including the chalk pastel trick for a hyper-realistic dusty blueberry finish
- [Polymer Clay Food Fridge Magnets: Pizza, Sushi & More →] Take your food magnet skills into savory territory
- [Polymer Clay Magnets — Shapes, Sealing & Hardware Guide →] The complete technical reference for magnet grades, sealants, and adhesives
Save this to your clay crafts or DIY gifts board on Pinterest so you can find it when you’re ready to make your first batch.
Which flavor are you making first — strawberry, chocolate, or classic glazed? Tell me in the comments.